Whether you are trying to avoid allergens or additives, making your own staples from scratch at home is a great way to gain more control over what goes into your body. But forgoing the convenience of ready-made items has a cost: it takes time. On the flip side, it usually saves money. Beans, plant milks and pizza dough are three basic, cost-effective and better-than-store-bought vegan staples that you can make at home without much skill or effort. Consider them the gateway to cooking from scratch…
Beans
Going from canned to home-cooked beans is a game changer. The cost is about half, the taste is noticeably better and the texture is exactly as you need it to be: cook them to a mush for spreads like hummus, or keep them firm under the tooth for salads. Bonus: you avoid the BPAs present in most can liners. There is a little bit of labor involved, but it requires very little active time.
Make sure you buy beans from a store that restocks often. If the beans are very old, they may never cook properly at all. Rinse your beans in a strainer with running water. Put the beans in a large pot, cover with water (at least 2 in/5 cm above the beans) and add a teaspoon of salt to the water. (Don’t listen to the old-wives tales that say the beans will harden if you add salt. It’s been thoroughly tested and the results are out.) Bring to a boil then reduce the temperature to reach a busy simmer. Allow to cook for 20 minutes then start testing a bean or two every five minutes. Chickpeas can take up to an hour but most beans will take 30-40 minutes. When they have achieved the desired doneness, drain and rinse with cold water to stop the cooking. It’s a great thing to do at the same time as folding laundry or doing dishes.
Let the beans cool completely and prepare for the freezer in 2-cup portions. For beans, I prefer using zip-top freezer-grade baggies, and I suck the air out with a straw. I lay the bags flat to freeze so the beans take very little time to thaw when I need them. Half-pint straight-walled glass jars are fine too. Don’t forget to label your containers with the date and type of bean. After use, I wash the zip-top bags in soapy water and reuse for the next batch.
You can follow these same steps for green, brown or black lentils (but start checking for doneness earlier), then freeze for future salads and bowls. For soups and curries, advance cooking is not usually necessary: the lentils can go in straight into the pot and cook along the rest of the ingredients.
Plant milks
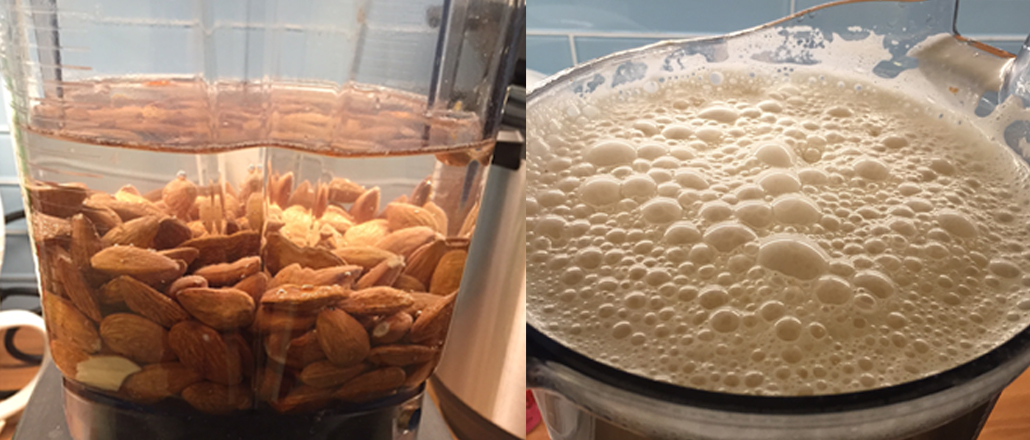
I got started making almond milk at home because I shop on foot. I’d much rather carry a pound of almonds than 10 quarts of almond milk! If you buy your nuts in bulk, you will see a significant saving compared to the shelf price of almond milk. Best of all, you will know that the creamy mouthfeel comes from actual almonds, not from thickeners.
You can make milk from many different ingredients at home. Cooked rice, oats (rinse really well or risk ending up a slimy beverage!), and seeds like sunflower, pumpkin or hemp also make delicious alternatives to dairy. They are also cheaper than nuts. Raw cashews are a great choice for busy home cooks because are sinfully creamy even without straining.
Making drinks from plants is not rocket science. There are tons of recipes online but you will learn more if you experiment by yourself. Nothing really bad can happen… as long as you don’t leave the shells in! I measure about 1/3 of a cup of nuts/seeds for each cup of water. I throw in a pitted date or two if I want a little sweetness, and a pinch of salt just because.
Other than a blender and nuts, a nut-milk bag (or any clean cotton bag, really; jelly bags work too) is useful here. Drinking unstrained milk is also enjoyable, just different. If you have the time, soak your nuts or seeds a few hours ahead of time. This is a necessary step if you do not have a high-power blender.
The key to making plant-based milks without a mess is to get organized before you start. Have a big bowl, preferably one with a spout, standing by. That’s where the strained milk will go. Also make sure the final milk container is right at hand! A funnel is good to have. If you are straining the milk, plan to have a container ready to store the pulp until you are ready to use it. You can substitute the pulp in muffin or cookie recipes for some of the flour, or make crackers.
Mom tip: When a muffin or cookie recipe calls for milk, I usually make it on the spot using whatever I have at hand, and I don’t strain. Seeds of all types are great for nut-free school snacks. It takes less time, and increases the nutritional value of the treats.
Pizza
Rediscover the joy of pizza and feel like a kitchen superhero by making your own at home from scratch! Making pizza dough is very easy and the flat stretchy bread is a perfect vehicle for nearly any combination of delicious fresh ingredients.
I find the easiest way to get started with pizza is the cold fermentation method. Just mix about 5 cups of all purpose flour with one package of active dry yeast (equivalent to 2 ¼ tsp). Add 2 cup of cold water, two teaspoons of salt, and mix well. Cover so it’s airtight and store in the fridge for two or three days. Then pull it out, kneed it a bit and allow it to rise in a warm place for an hour or two. You are then ready to stretch it. Consider making a rectangle pizza that fits your (lightly oiled) baking sheet to use your oven space most efficiently!
Cover with the toppings of your choice. Be creative! It’s nice to have something saucy at the bottom (tomato sauce, pesto, hummus even!), then lots of thinly sliced veggies and a sprinkle of chickpeas or beans maybe, plus a drizzle of cashew cream, chutney or dairy-free dressing. Really, anything goes. I am known to spread leftover curries and refried beans on my pizza dough.
Bake in a preheated oven at 500F for 12-17 minutes, pulling it out when the crust gets golden. Repeat every Friday!
You can freeze the dough after the first 2-3 days of cold fermentation. Wrap the dough ball tightly in plastic then save into a labelled zip-top bag in the freezer. It will keep well for three months. Just pull it out the night before and allow to thaw in the refrigerator before the final rise.